Sunday, November 4, 2012

Braised Pork Chops


It has recently been brought to my attention that I have not written to a new blog post since early August.  I have been really busy since August, starting a new school year, and then promptly switching to an entirely new school district a month later.  This transition has taken a fairly significant toll on me; however, despite any excuses I may have, the idea of a three-month absence from my blog honestly makes me wince.  A blog is not a static creature; it only exists for as long as it is actually being written, and mine was coming dangerously close to extinction.  The longer I went without writing, that more difficult it was to even consider making time for it.  Alas, I am sitting in front of my computer, with my proverbial tail between my legs, with the offering of some humble pork chops to my audience (assuming I still have one).  This is my first prolonged absence (and probably not my last), but hopefully this post bring a resurgence of cooking and blogging in my life.  At the very least, it brought some braised pork chops into my kitchen.
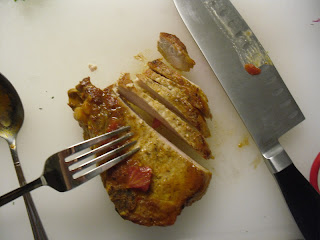
The weather is getting colder and days darker, and this is truly my favorite time of year to cook.  Soups, braises, baked pastas, and roasted vegetables are perfect for the winter months, and these are the recipes that resonate with me.  I don’t believe there is a pork chop recipe to date on my blog, so I thought I would expand my horizons, but do so with one of my favorite and familiar cooking methods: braising.  First, I seared the pork chops.  The key is to let them get really brown; make sure the pan is hot and let them sear, undisturbed, for about 5 minutes on each side.  There may even be a few wisps of smoke.  Then I let them simmer in tomatoes and white wine, with capers and herbs.  I don’t make a lot of pork chops, but in general, bone-in cuts result in more flavor, so I went with bone-in, center cut pork chops, and they were even better than expected.  I used fresh thyme, but I think any combination of herbs would work (dried or fresh).  Despite the fact that it is November, my outdoor thyme plant is thriving on my balcony, so I am taking advantage of it while I still can.  Lately, I’ve been cooking the simplest things possible, mostly on the grill to minimize dishes.   I’ve been avoiding anything more involved, but cooking and writing about these pork chops felt like a relief.  I also made some lemon-thyme couscous, which seemed right at home with the tomatoey sauce.  And I made some roasted broccoli as well because I can’t seem to get enough of it lately, but sautéed spinach would have been another perfect accompaniment. 
Braised Pork Chops with Capers, Tomatoes, and Thyme

1/2 tablespoon butter
1/2 tablespoon olive oil
salt and pepper
1/4 teaspoon hot pepper flakes (optional)
1 lb. pork chops (center cut, bone-in.  This amount of sauce could handle one to one and half pounds)
1 small red onion, sliced
2 garlic cloves, sliced
2 tablespoons tomato paste
2-3 teaspoons fresh thyme, plus extra for garnish
1 cup white wine
1 14 oz. can diced tomatoes
2 tablespoons capers
1 teaspoons red wine vinegar or lemon juice
Freshly chopped parsley for garnish (optional)

-       Season pork chops liberally with salt and freshly group black pepper
-       In a large sauté pan, heat olive oil over medium high heat, for 4-5 minutes, until lightly smoking, and add the butter.  Stir to combine.
-       Add pork chops in a single layer or in batches (do no crowd them, or move them around to allow them to brown for about 5 minutes per side).  Remove browned pork chops from pan and set aside.
-       Add onions, season with salt and pepper, and hot pepper flakes, if using (add another teaspoon of oil if the pan looks dry), and sauté and stir frequently for 8-10 minutes until they are softened but not browned.
-       Add tomato paste, garlic, and thyme and sauté, stirring constantly, for about 1 minute. 
-       Add white wine, bring to a boil and add canned tomatoes.  Allow mixture to boil for about 5-8 minutes so it reduces slightly (by about a 1/4-1/3)
-       Add capers to the mixture, then return the pork chops to the pan.
-       Reduce the heat to medium (so the mixture is simmering, but not aggressively boiling), cover the pan, but leave the lid vented so that steam can escape.
-       Allow to cook for about 15 minutes, flipping pork chops every 5 minutes.
-       Finish with lemon juice or vinegar; serve with lemon-thyme couscous

Lemon Thyme Couscous

1 cup reduced sodium chicken stock
2 teaspoons fresh thyme leaves
Zest of 1 lemon
3/4 cup of couscous
2 teaspoons fresh lemon juice
2 teaspoons extra virgin olive oil
Salt and pepper

-       Add chicken stock, thyme, and lemon zest to a small pan and bring to a boil.
-       Add couscous, turn off heat and cover.  Let stand for 5 minutes until all liquid is absorbed.
-       Fluff with a fork and season with lemon juice, olive oil, and salt/pepper.


Wednesday, August 8, 2012

Artichoke Pasta with Lemon Grilled Chicken


I really shouldn’t go into a lot of detail here.  It is simply unnecessary, but I can’t help myself.  This delicate pasta recipe should sell itself with its classic flavors, imprinted with the latest psycho cooker trend: grill everything.  This light summery pasta is full of flavor.  I started with a simple marinade for chicken breasts, consisting of a few ingredients with big flavors: white wine, fresh lemon zest/juice, extra virgin olive oil, and a few tablespoons of fresh thyme.  I whisked the ingredients together in a wide shallow dish, so my chicken cutlets could take a languid swim in this tart concoction (albeit a brief dip; this marinade is highly acidic, so only let those tender birds hang out in there for 20-30 minutes maximum).
In the meantime, I preheated my grill to medium, put a pot of water on for pasta, drained my artichoke hearts, and chopped up some garlic and herbs.  That’s all the chopping that is requiring assuming you buy quartered artichoke hearts.  Grilling the chicken is simple: when they have a nice char and feel firm, they are done.  And they will smell intoxicatingly delicious.  This can be done at any time, unless you refuse to eat food that is anything but searing hot.  The sauce for the pasta is put together in a single skillet, and I like to take the cooked pasta directly from its pot to the saucepan.  This will allow you to skip washing a strainer and you will get just the right amount of starchy pasta water from the get go. 
The sauce… a little bit of garlic, olive oil, white wine, chicken stock, and lemon juice.  It’s a brilliant combination; I wish I could take credit for it, but instead I will tip my hat to a nameless, faceless Italian grandmother.  When the sauce comes together, the artichoke hearts go in to heat through, and a little bit of butter is nice for an increased luxurious quality.  Other than that, everything else will go in, uncooked, after the pasta has been added (capers, baby spinach, handfuls of fresh herbs, parmesan cheese, copious amounts of black pepper).  Once I reached my desired balance of flavors and textures (a little extra pasta water, another grind of pepper, etc. etc.), I topped the delicate curls of angel hair with the sliced grilled chicken.  The pasta would be delicious on its own: tart, clean, bright, and balanced.  However the smokiness of the chicken adds a powerful extra flavor dimension.  And the chicken’s absence would have made my grill feel left out, and I just can’t have that.
Lemon-Thyme Grilled Chicken

1 lb boneless, skinless chicken breasts, sliced into 4 cutlets
1/2 cup white wine
Zest and juice of 1/2 lemon
1 tablespoon chopped fresh thyme
3 tablespoons extra virgin olive oil
Kosher salt and freshly ground pepper

-       Whisk together the white wine, lemon zest/juice, thyme, and olive oil in a wide, shallow dish
-       Lay chicken cutlets in marinade, and let sit in the refrigerator for about 20-30 minutes, flip occasionally.
-       Preheat a grill to medium heat.  Season marinated chicken cutlets with salt and pepper and grill on each side until cooked through, about 4-5 minutes per side.

Artichoke Pasta

2 tablespoons olive oil
1 small clove garlic, minced
1/4 teaspoon hot pepper flakes
1/2 cup white wine
3/4 cup chicken stock
Juice of half a lemon
1 can quartered artichoke hearts, drained and rinsed
1 tablespoon butter
2 tablespoons capers
2-3 big handfuls baby spinach
Fresh herbs to tastes (I used basil and parsley)
Kosher salt and freshly ground black pepper
8 oz. angle hair
Freshly grated Parmesan cheese

-       Place a large pot of water on high heat to come to a boil.
-       In the meantime, preheat oil in a large skillet over medium heat.  Add garlic and hot pepper flakes, and sauté for one minute.
-       Add white wine and simmer until reduced by half.
-       Add chicken stock and simmer until reduced by almost half.
-       Add artichokes hearts, lemon juice, and season liberally with salt and pepper.
-       Add butter.
-       While artichokes are heating through in the sauce, cook pasta until just shy of al dente (this will only take a few minutes, and the pasta should be slightly underdone as it will cook more in the sauce).
-       Add the pasta with tongs directly into the sauce (don’t worry if some of the cooking water comes with it).
-       Add spinach and capers.  Toss to combine.  Add more pasta water if it seems dry.
-       Check for seasoning, and add if necessary.  Then toss with herbs and cheese if desired.  Top with sliced grilled chicken.

Wednesday, August 1, 2012

Grilled Tofu and Vegetables... And Sandwiches


I actually really enjoy tofu.  Truly.  I like it so much that I will eat cubes of it cold, straight from the package when I am cooking.  You may not believe me, but after perusing my other recipes, I think it will become quickly obvious that I am not trying to impress anyone with my healthy eating habits.  Sometimes, it’s nice to marinate some tofu and vegetables (bell peppers, zucchini, and cremini mushrooms), and get them on the grill.  They don’t require much time to marinate or grill, and they make for a virtuous, complete dinner when paired with some brown rice.  I let all grilled items take a 10-minute dip in a flavorful Asian marinade with soy sauce, garlic, sesame oil, and fresh limejuice to avoid any boring vegetable qualities. 
The key is to use a medium low heat, and spray the grill liberally with non-stick cooking spray (this will also lead to a delightful flare-up, which I’m sure is dangerous).  The bell peppers and the mushrooms take the longest to grill, so start there.  However, the tofu poses the greatest danger of sticking.  Grill the stout planks of tofu for about 3 minutes on one side, flip, and repeat.  When flipping them or removing them from the grill, give them a very gentle side-to-side shimmy until they release.  If they stick a little, don’t panic.  Simply proceed as planned, but then remove any pieces that stick and be sure to eat them.  They have sort of a bacony quality.
The best part of this meal was the leftovers.  And, to be honest, I designed this meal with the leftovers in mind.  For anyone out there who claims they dislike leftovers, I say you’re simply not putting enough thought into the use your leftovers.  Not everyone enjoys forkfuls of cold, sauced pasta; I’ll acknowledge that.  However, with a little thought put into your cooking, your leftovers can be a delicious wonder in their own right.  Case in point: grilled tofu and vegetable sandwiches.  I spiked some mayonnaise with limejuice and sriracha.  I then layered the leftover zucchini, grilled peppers, and tofu on some rosemary sourdough bread with some of my spicy, tart sauce, and enjoyed a very flavorful and satisfying sandwich.
Grilled Tofu and Vegetables

Juice of 1 lime
2 teaspoons honey
1 garlic clove, grated
3 tablespoons soy sauce
2 tablepsoons fish sauce
2 teaspoons toasted sesame oil
1 teaspoon sriracha
2 tablespoons rice wine vinegar
3 tablespoons canola oil (or other light colored oil)
1-2 zucchini, sliced in long planks
2 red bell peppers, sliced into “cheeks”
8-10 cremini mushrooms, stems trimmed
1 block of extra firm tofu

-       Cut tofu into 6 pieces.  Line a shallow, wide dish with a clean cloth napkin.  Lay tofu pieces in napkin and wrap the napkin over the tofu.  Place a heavy bottomed pot over the napkin and allow tofu to drain for 15-20 minutes.
-       Whisk together the first 9 ingredients for marinade, and prepare vegetable. In one or two wide dishes, lay all ingredients down and pour 3/4 of marinade over them.  Gently flip tofu and vegetables in marinade.
-       Preheat grill to medium, and then reduce heat to medium low just before adding food to the grill.
-       Cook bell peppers and mushrooms for 8-10 minutes total, or until tender.
-       Cook tofu and zucchini for 4-5 minutes total.
-       Serve with brown rice and drizzle with remaining marinade.

Friday, July 20, 2012

Turkey Meatball Burgers


A lesson in semantics: if you refer to something as a “burger,” it should be a patty made of meat, and only meat.  Some salt and pepper are also acceptable, but it should stop there.  If you are adding breadcrumbs, egg, herbs, and cheese, it is no longer simply a “burger.”  Think about how you would respond at your local bar if you ordered a cheeseburger, and it was full of breadcrumbs and minced onion.  It might be delicious, but that’s not what you ordered.  Rather, these augmented patties require some sort of qualifier in the title, like meatball burgers, or spanikopita lamb burgers, or Provencal burgers.  It may be totally delicious, and make your eyes roll back in your head, and you may vocalize involuntary, guttural sounds.  But don’t call it a burger. (You may, however, call me overly opinionated; I couldn’t argue with that.)
Alas, I present to you, with full disclosure, my turkey meatball burgers.  The primary component is ground turkey, seasoned liked a traditional meatball, shaped into a patty, and grilled.  Hence, the name: turkey meatball burgers!  I have this little problem with overcooking things on my grill, so I figured it would behoove me to choose a recipe that requires you to cook it all the way through.  These burgers did the trick.  I made them in the exact same way I make meatballs (breadcrumbs, egg, shredded parmesan, tomato paste, herbs, a touch of water).  I did one tiny thing different: I added some fresh thyme because it goes well with turkey, and I have an overgrown clump of it taking over the herb pot on my patio.
Because I made them with turkey and because they have all of sorts of other junk in them, I feel that it is very important to liberally oil the patties prior to grilling to prevent sticking.  I don’t know what would happen if you didn’t do this, but I don’t want to find out.  I think the easiest way to oil a patty is by first liberally oiling the plate you intend to stock pile your finished patties on.  That way, when you have a completed patty, you can simply give it a quick swipe on each side with the oil. 
Then you get to grill!  It is very straightforward because you are not aiming for the finesse of medium or medium well; you just want the patty to be cooked though and very firm to the touch.  If you are highly neurotic like some people I know (namely myself), you can even cut into one to make sure there is no indication of teaming salmonella (i.e. the burger should not be pink).  Then top your patties with a heaping spoonful of marinara sauce, a sprinkle of Parmesan cheese, and a slice of Muenster.  Of course, you could go with something more traditional like mozzarella or provolone, but there is something about the salty, stringy quality of melted Muenster that really compliments this.  I used to work at the Palm Restaurant, which is a steak house, but it is rooted in Italian heritage.  They serve killer chicken parm, and I credit the parmesan/muenster cheese combo for the addictive deliciousness.  If that doesn’t have you convinced, please take a look at the stretchy string of cheese displayed below, and you may be running out to the deli counter before you even finish reading this.
I served my turkey meatball burgers open-faced on some French bread, adorning the bread with a little extra marinara before plopping the patty on top.  A pile of spinach sautéed with garlic, oil, and lemon served on the side will even make you feel healthy (at least that’s my twisted logic).
Turkey Meatball Burgers

3/4 lb. ground turkey thigh
1/3 lb. ground turkey breast
1 tablespoon tomato paste
1/2 cup finely shredded parmesan, plus two tablespoons
1/2 cup Italian seasoned breadcrumbs
1 egg, beaten with 1 tablespoon of water
1/4 of a medium sized sweet onion, grated on the large holes of a box grater (include all juices)
1/4 cup finely chopped flat leaf parsley
2 teaspoons finely chopped fresh thyme (optional)
1/2 teaspoon Lawry’s seasoned salt
1/2 teaspoon freshly ground black pepper
1/4 teaspoon hot pepper flakes
1-2 tablespoon light colored oil
1 cup jarred marinara sauce
Sliced Muenster cheese (or mozzarella)
Sliced French bread or crusty rolls
Basil for garnish (optional)

-       In a mixing bowl, combine tomato paste, Parmesan, breadcrumbs, beaten egg, grated onion, chopped parsley, thyme, seasoned salt, pepper, and hot pepper flakes until the mixture is even.
-       Add both ground turkey breast and thigh, and mix together until just combined with clean hands.
-       On a large plate, pour oil and lightly spread around.
-       Form the turkey mixture into patties (I made 5).  If the mixture is very sticky, let wet hands slightly (I keep a small bowl of water nearby and occasionally dip my fingers in it).  As patties are formed, set them aside on the oiled plate, rubbing them lightly with oil on both sides.
-       Preheat a grill to medium for at least 10 minutes.  Cook the patties on the grill for about 10 minutes on each side.  (The patties must be completely cooked through.)
-       When the patties are done, top with a spoonful of marinara sauce, a pinch of Parmesan, and a slice of Muenster.  Close grill and allow the cheese to melt.
-       Serve the meatball burgers on desired bread with extra sauce, and garnish with basil.


Thursday, July 5, 2012

3-Cheese Grilled Cheese with Basil

I am currently in Detroit at my parents’ home, whose well-stocked refrigerator and pantry allows me to dabble to my heart’s content.  Today’s experiment: a truffle scented grilled cheese sandwich with fresh basil on olive bread.  The truffle aspect probably makes my parents sound a little snootier than they are in reality; however, they are very passionate about food (they prefer both quantity and quality).  My mom and I were in the grocery store the other day, and she pointed out a small package of truffle butter as we were walking through the dairy isle.  She said “we have some of that at home; dad and I like to put it on popcorn sometimes, like Ina Garten.”  My mom likes to buy different varietals of popcorn at the Detroit farmer’s market, and she pops it on the stove.  My dad hovers near by, watching her in awe, and then scoops popcorn into his mouth by the handful, eating happily and peppering the floor with the evidence.  In a nutshell, they love food, and obviously the apple doesn’t fall far from the tree.
So I took advantage of their beautiful kitchen and food supply one lazy afternoon during my trip home.  I started by splicing shards of cheese off a large block of Jarlberg that was loitering in the fridge.  I crumbled some feta, and gathered a small pile of shredded Parmesan on a plate.  I set all the cheese aside to allow it to come to room temperature for a deluxe grilled cheese sandwich.  I then removed a clump of basil from the bushy plant on my parents’ front porch, and buttered both sides of two pieces of bread studded with Greek olives.  Why butter both sides? Because the outside required butter for browning, and the inside received a delicate layer of truffle butter for flavor.  I let all of my ingredients come to room temperature before layering them together to compose my beautiful sandwich.  While I waited for my ingredients to lose their chill, I had the perfect pocket of time to cut up this beautiful watermelon.
I finally cooked my sandwich in a small sauté pan over a very low heat.  When it reached the ideal state of golden brown, with cheese beginning to bulge from the sides, I let it rest on the rack of the toaster over (no heat).  This allowed the molten cheese to settle (and to protect your mouth from burns), without the bread getting soggy on one side.  In a few minutes it was ready for a swift diagonal cut in half, which was the final step before my mom and I devoured it.  It was delicious and ridiculously decadent.  The flavor of the truffle butter may have gotten lost in the richness; however, the basil makes a huge difference, waking up the whole sandwich and cutting through any excess richness and saltiness. 

Sunday, July 1, 2012

American Fare Remix


I spend copious amounts of time perusing recipes on the Internet.  Perhaps I should say I spend copious amounts of times “cruising” recipes on the web because there is a certain lustfulness to it.  The indefiniteness of web-based recipes… it makes my heart race a little.  I can never get bored of it.  And my own relentlessness combined with the infinite abyss of the Internet lead me to the Juicy Lucy.
The Juicy Lucy is a burger stuffed with cheese.  As I am in the midst of romancing my new grill, the Juicy Lucy was an obvious next step in our courtship.  It’s actually rather simple:  two very wide, thin burger patties are joined together with a core of sliced cheese, and grilled.  Brilliant.  If you are very lucky, rivulets of cheese will peak through the patty as it is being cooked, hinting at the molten cheese just beneath the surface.  Use American cheese, a good quality, deli-sliced American cheese.  It’s excellent on burgers, and it melts and oozes beautifully.
The Juicy Lucy was fabulous.  As you can see, I had a minor problem with the meat sticking to the grill.  However, problems are relative; once I saw the molten cheese peaking out of the edges, my dismay melted away.
I was also, oddly, craving potato salad.  And thus, I whipped some up in 98-degree heat.  I felt the need to boil a huge pot of potatoes in my AC-absent apartment.  It had better be good.  What I produced, I am calling “dressed-up American potato salad.”  It contains mayonnaise for the requisite American richness, as well as coarsely chopped hardboiled eggs, but its flavor and texture are augmented by vinaigrette-like ingredients: fresh lemon juice, white wine vinegar, extra virgin olive oil, fresh herbs.  Delicious.  Capers would also be excellent in this.
The potato salad, the burger, and a random avocado lingering in my refrigerator apparently had a meeting with destiny.  On my burger, you will notice a green, creamy substance on the bottom bun.  Smashed avocado?  Yes, but it’s even better.  It’s smashed avocado spritzed with lemon juice and mixed with about a tablespoon of the dressing for the potato salad: mayonnaise, olive oil, Dijon, lemon, white wine vinegar, and copious amounts of salt and pepper.  I’d call that a perfect storm, and it made my burger compliment the potato salad oh-so-nicely.  The Juicy Lucy would also be fabulous simply adorned with pickles.
Juicy Lucy (based on the recipe from chow.com

For each burger:
1/4-1/3 lb. ground beef (85% lean)
1 sliced American cheese
Lawry’s seasoned salt
Sesame seed hamburger bun
Sliced pickles or avocado spread for garnish

-       Break the slice of cheese into 4 equal pieces by folding it in half, then folding it in half again.  Set aside
-       For each burger, divide the meat in half.  Use a broad plate (lightly oiled, if desired) to carefully press the meat into two flat, wide circles, approximately one inch in diameter wider than your hamburger bun.
-       Place cheese in the middle of one patty and carefully lay the other one on top.  Mold the edges together, and roll the edge of the jumbo, cheese stuffed patty against the palm of your hand to help to come together and have a circular shape.
-       Preheat a grill to medium and cook on each side for 3-4 minutes, flipping once.  Allow burgers to rest for 5 minutes to all juices and cheese to evenly distribute; add desired toppings and enjoy.

Potato Salad

For the dressing:

2-3 tablespoons white wine vinegar
Juice from half a lemon
2 tablespoons Dijon mustard
1/4-1/3 cup mayonnaise (I like the kind made with olive oil)
1/4-1/3 cup extra virgin olive oil
Kosher salt and freshly ground pepper

-       Whisk together all ingredients to taste.  You should have about 1 cup of dressing when you’re done.  I made it in a large measuring cup to make my life easier.

For the Salad: 

3 scallions, minced
2-3 tablespoons chopped fresh parsley
1 tablespoon chopped fresh thyme
3 rib of celery, diced finely
2 hard boiled eggs, coarsely chopped
2 1/2 lbs. Yukon gold potatoes, skin left on, chopped in 11/2 inch chunks.
Kosher salt and pepper

-       Add potatoes to a large pot and cover with cold water.
-       Place on high heat and add 1-2 tablespoons of salt to the water.
-       Bring to a boil, stirring occasionally, then reduce heat to a simmer.  Simmer for 15-20 minutes until potatoes are fork tender but not mushy.
-       Drain in a large colander, and then cover with a clean dish towel for 10 minutes to allow potatoes to finish cooking in their own steam.  This will allow for even cooking without over cooking.
-       Transfer potatoes to a large bowl and add dressing and other ingredients until you achieve your desired consistency.  Eat warm or refrigerate.  Reserve any leftover dressing because the consistency/seasoning may be different once the potato salad is cold.

Tuesday, June 19, 2012

Grilled Chicken Tacos

As predicted, my grill is my new best friend.  Everything tastes better grilled, plus being outside around dusk is rather lovely in and of itself.  I used to cook so that I could eat outside in the summer; now I get to cook outside and eat outside.  These grilled chicken tacos were simple and fun to make: marinated chicken thighs, appropriate condiments, wrapped up in a flour tortilla.  The marinade was delicious: cumin, chili powder, a little cayenne, and limejuice, mixed with olive oil.  I could have eaten the chicken plain.  I suppose it was more of a glaze than a marinade, viscous and deeply colored.  I think it would have tasted great even if the chicken had just taken a quick dip in it, rather than the 30-minute soak I allowed for.
I topped the tacos with salsa, cheese, sour cream, and red cabbage.  I like the “Santa Barbara” Brand salsa.  It’s refrigerated and very fresh tasting.  My favorite is their hot salsa, but I haven’t had one that I didn’t like.  The red cabbage was both hearty and refreshing.  I was a little concerned that it was going to be too strong of a flavor, but it worked beautifully, and it’s definitely healthier and more interesting than head lettuce.  However, the red cabbage prompted me to add the sour cream.  I thought it would mix well with the cabbage and salsa, and allow the whole thing to mellow out.  I actually made an additional trip to the store once I got home because I felt it was that important.  I’m sure the tacos would have been perfectly edible without it, but it was worth the trip.  Next time, I might want to finely shred my cheese though, and possibly change the order of my layers.  Still, this was overall a delightful summer dinner.  
Grilled Chicken Tacos (makes about 6-8 tacos, loosely based on this recipe)

1 lb. boneless skinless chicken thighs
4 tablespoons fresh lime juice
4 tablespoons olive oil
1 teaspoon cumin
1 teaspoon chile powder
1/8 teaspoon cayenne pepper
1/2 teaspoon Lawry’s seasoned salt
For taco assembly:
Small flour tortillas
Thinly sliced red cabbage
Shredded Monterey jack cheese
Sour cream
Salsa

-       In a medium bowl (big enough to hold all of the chicken), whisk together all of the spices, and lime juice.  Slowly drizzle in olive oil, whisking as you go.
-       Add chicken and evenly distribute in marinade.  Set aside for 20-30 minutes.
-       Meanwhile prepare all taco condiments, and preheat a gas grill at medium heat for 10-15 minutes.
-       When hot, lay chicken on the grill, smooth side down, for 5-6 minutes a side.
-       When chicken is cooked through, slice it thinly for tacos.  Assemble tacos and enjoy.

Sunday, June 10, 2012

White Bean and Feta Dip


This is a tasty to morsel to share with friends, and requires no heat to make (a big bonus in these summer months).  It is sort of like an Italian hummus: smooth, creamy bean dip flavored with garlic and lemon.  Unlike hummus, it is made with white beans, as opposed to chickpeas, and it does not contain tahini (a sesame seed paste that all legitimate hummus contains).  It also has some fresh herbs in it.  I would recommend putting them in at the very end of the blending process, as my herbs became a little overly-pulverized for my tastes.  It was still delicious. 
I made a big mess
It is based on a recipe by Giada de Laurentiis, but made infinitely better by the addition of feta cheese.  She recommends serving it with pita chips, but I prefer sliced hothouse cucumber.  It’s much more refreshing.  I used an immersion blender to make this.  The recipe is easier with a traditional blender, but still manageable with an immersion blender.  You may have to dislodge some beans from the blade intermittently, and occasionally do a little hand mixing for even distribution of ingredients.  Or at least that’s what happened to me.  But it was well worth that minimal extra effort for a creamy, garlicky, crowd-pleasing appetizer. 
White Bean and Feta Dip (adapted from Giada de Laurentiis)

1-14 oz. can cannellini beans or great northern beans, drained and rinsed
1 clove of garlic, grated on a microplane
Juice of 1 lemon
1 tablespoon water
1 tablespoon chopped fresh thyme
2 tablespoons chopped fresh parsley
1/4 cup extra virgin olive oil (you may not need all of it)
1/4 cup crumbled feta cheese
1/2 teaspoon kosher salt
1/2 teaspoon freshly ground black pepper
Hot house/seedless cucumber, sliced
Extra feta, herbs, and olive oil for garnish

-       Place beans, lemon juice, water, and grated garlic in the base of a blender or the canister of an immersion blender.  Pulse a few times to begin to combine the ingredients.
-       Add olive oil slowly (if using a traditional blender, use a slow steady stream; if using an immersion blender, add a tablespoon or two at a time, blend, hand stir, and repeat until you achieve your desired consistency).
-       Add herbs, feta, and salt/pepper.  Blend again.  Check for seasoning.  Garnish with an extra drizzle of olive oil, sprinkle of herbs and feta, if desired.  Serve with cucumber slices, crackers, or tortilla chips, etc.