Showing posts with label vegetarian. Show all posts

Sunday, June 8, 2014

Scrambled Eggs with Beans

This is my comfort food, weeknight meal of the moment.  I tend to find something I like, eat on it repeat, and then burn out.  My current food crush is scrambled eggs with cheese and refried beans.  This simple preparation of store-bought ingredients results in a quick, satisfying meal.  It consists of slightly doctored refried beans, topped with perfectly scrambled eggs and shredded cheese, along with a splash of hot sauce and a little avocado, if you have it. 
I have made it a few times now, and timing is essential for success.  Everything must be ready and waiting for the scrambled eggs.  Since it is a simple meal with only a few ingredients, the eggs must be perfectly cooked.  Scrambled eggs are a delicate food because they cook so quickly; they must be removed from the pan immediately when they have reached your desired level of doneness (or even just prior) because extra time in the pan results in residual cooking, even if you have removed them from the burner.  I like to get my refried beans in the bowl (about a half cup, and I typically prefer refried black beans), cheese shredded, avocado sliced, and eggs beaten before I apply any heat to anything.  Then I heat the beans up in the microwave for about 30 seconds, stir, and season with hot sauce, pepper, and whatever else strikes your fancy (extra cumin, garlic salt, whatever sounds good).  Give the doctored beans a stir, and 30 more seconds in the microwave.  Then leave them in the microwave, pending a final zap just prior to serving.

Now is the time to cook your eggs.  I add about a teaspoon of olive oil to a small sauté pan, and allow it to preheat for a couple minutes over medium heat.  When it is hot, I add the eggs, and stir in long, slow strokes toward the center of the pan as the curds start to form.  When the eggs are still wet, but approaching doneness, give the beans their final jolt of heat in the microwave (about 15-30 seconds).  Give your eggs a final stir; add them on top of the beans with avocado slices, and sprinkle with cheese.  This past week, I was using a cheddar-gruyere combination from Trader Joe’s, which has the flavor of medium white cheddar, but a creamier texture, that allows it to melt more smoothly than your typical cheddar.  This dish would be great with homemade refried beans; making refried beans is simple, but it would detract from the quick, easy quality of the meal.
extra Frank's Red Hot on top
This dish could be prepared with over easy eggs.  The runny yolk would be delicious, but I enjoyed the uniformity of the scrambled egg version.  When I eat over easy eggs, I sometimes feel pressure to ration out the golden yolk throughout my dining experience; this is likely singular to me, but this week, I didn’t want any undue stress.  This is a flexible recipe, so make it to suit your tastes, but my mental health required the consistency of scrambled eggs.  I also like the way the soft textures of the beans and eggs complement each other, but still maintain their identities.    

Friday, April 25, 2014

Easter Egg Pasta

The most recent issue of Bon Appétit is pretty brilliant; while I read it every month upon arrival in my mailbox, this month’s copy has myriad recipes that I truly want to make, flagged with hot pink Post It notes.  On the list of intriguing items, there was a short article on various uses for leftover Easter Eggs.  Though I don’t celebrate Easter, but I do enjoy eggs.  One of the recipes was for a garlic-olive oil-anchovy-based pasta that was finished with grated hardboiled eggs and parsley.  I would never in a million years imagined adding hardboiled eggs to my pasta, but the rest of the ingredients are some of my all time favorites, and the addition of the eggs was intriguing enough for me.
I have been a long time fan of pasta dressed in garlic-lemon oil, and finished with a ton of parsley and Parmesan.  There are many variations to this theme:  a little anchovy paste sautéed with the garlic; a few capers; olives; a splash of white wine.  Nonetheless, the result is always some version of lemony, bright, garlicky pasta, with a healthy dose of freshness from plenty of chopped parsley and salty Parmesan.  It’s a recipe for success. 
This Easter-inspired version is exactly that with the addition of hardboiled egg.  It’s certainly a strange idea, but I enjoyed it at every turn.  For starters, I’ve never grated an egg before, which turned out to be a satisfying experience.  Using the large holes of a box grater, the soft egg all but disappeared with a few stokes, resulting in stands of egg white and crumbles of egg yolk, ready to absorb the salty, rich dressing on the pasta.  The richness of the egg juxtaposes nicely against the coarsely chopped parsley leaves, which render this dish almost to a salad like state. 
This dish is rich, but well balanced.  I did not skimp on the anchovy paste, which was evident in the toasted brown color that the pasta took on when it was tossed with the spicy, anchovy-infused oil.  This richness is then tempered by multiple elements.  The first and most obvious is the parsley leaves; peppery, a little lemony, and decidedly green in flavor, they impart lightness with both their flavor and texture.  Ironically, the egg also lends levity that is unexpected.  The yolks and whites act in very different ways.  The yolk coats the pasta and absorbs the olive oil-based sauce, softening the flavors from preserved fish and red chile flakes.  On the other hand, the egg whites provide lightness with tenderness and little volume.  Basically, they prevent the pasta from being construed as a big, dense heap of carbs, a noble and necessary task.  I’m sure the entire idea sounds bizarre (hardboiled eggs in pasta?), but it was quite delightful.  And a senior food editor at Bon Appétit created this concoction, not me, so hopefully that indicates that this is a legitimate recipe, as opposed to me losing my mind with my pasta-loving ways. 

Easter Egg Pasta (adapted from Bon Appétit)
Makes 2 servings

1/4 pound short cut pasta, like campanelle or fusilli
2 tablespoons olive oil
2 cloves garlic, minced
1/4 teaspoon red chile flakes
1 teaspoon lemon zest
2 teaspoons anchovy paste
3 tablespoons finely grated Parmesan
1 tablespoon lemon juice
1 1/2 tablespoons capers
2 hard boiled eggs, coarsely grated
1/2 cup coarsely chopped Italian parsley leaves

-       In salted boiling water, cook pasta until it is al dente per package directions.  Reserve 1/2 cup of the cooking water, and drain the pasta.  Set aside.
-       In a sauté pan, cook garlic, red chile flakes, lemon zest, and anchovy paste in the olive oil for about 3 minutes.
-       Add pasta to the pan, and toss to coat.  Season with freshly ground black pepper.
-       Add lemon juice, capers, and Parmesan.  Add a few tablespoons of the reserved pasta cooking water if the mixture seems dry. 
-       Add the parsley and hard-boiled eggs.  Garnish with more cheese and parsley if desired.


Friday, March 28, 2014

Curried Broccoli-Cauliflower Soup with White Cheddar

I am heading out of town in a few days, and I wanted something to eat this week that would be readily available and somewhat detoxifying, as I know calorie-laden food will probably abound while I’m on vacation.  I settled on broccoli soup, akin to the one in this post, but as I contemplated my plan of attack, the recipe evolved throughout the day, into a new and blog-worthy form.  Initially, it was supposed to be the vision of simplicity: broccoli, onion, and potato, simmered in chicken broth, then pureed and finished with a little white cheddar, but this beast had a mind of its own.  First, I thought that cauliflower would be a welcome addition.  Then, while skimming through Google searches for recipes, the word “curry” seemed to leap off my computer screen, and land squarely in my mouth.  My dinner’s direction and suddenly become very clear.

The truth is: the smell of curry powder destroys me: mystifying, intoxicating, delightful.  This reaction may seem extreme, but perhaps you have never experienced the aroma that ensues when curry powder hits a hot pan.  Or maybe you weren’t paying attention.  It is one of those instances when the whole exceeds the sum of its parts.  I love foods that fall under this category, as it is truly the magic of cooking; a great pot of soup and other slow cooked dishes tend to spring to mind, as I ponder this notion.  What could be more fitting that a curried soup?  My most recent jar of curry powder (curry powder must be fresh) had a detailed list of ingredients, relative to the other available brands of curry, whose ingredient lists’ consisted vaguely of “turmeric and other spices.”  The jar I purchased included fenugreek, coriander, cumin, turmeric, ginger, cinnamon, and nutmeg, amongst other things.  I was pleased to have access to the list, and tried to engage in a little sniff test to see what I could identify; yet, all I could do was deeply inhale and smell the whole earthy combination.  I nearly chocked a couple of times, but it was worth it.

The recipe that resulted from all this excessive thought is a winner for more reasons than one.  First of all, I started the right way: with butter.  This soup is essentially a big bowl of pureed vegetables, and I felt that it needed the rich boost in its base that only butter can provide.  Well, that and bacon fat, but that’s sort of crossing a line when it comes to being considered “vegetarian.”  Regardless of semantics, butter provided a richness in both texture and flavor that was the right fit.  Onion and garlic were then sautéed in the frothy butter foam, until tender; curry powder, nutmeg, and a little cayenne were then lightly toasted in the buttery onions.  Next came the cauliflower and small-diced potato, with just enough broth to cover.  The potato is only there for body, so dice it fine, allowing it to disappear into the soup.  Additionally, it’s crucial to not use excess broth because that will make this pureed veggie soup seem unsatisfying.  After a few minutes, I threw in the broccoli and a touch more broth, and allowed everything to become soft and unctuous.  I whirred the veggie concoction together with my favorite toy, my immersion blender, until it was smooth, with a few stray pieces of curry-stained cauliflower.  A bay leaf would have been a nice touch, but I was too twitterpated by the aroma of the curry powder, and it just slipped my mind. 

I finished the soup with cheese: a sturdy, sharp white cheddar.  Cheese may seem a little off-putting in conjunction with curry; however, the soup needed some sort of salty, creamy, savory element to round out the flavors, soften the edges, and bring them together.  Cream certainly would have been the more obvious choice, and could easily by substituted with about a quarter to a half-cup, but cheese is a clear favorite in my book.  I also think the sharpness of the cheddar adds depth, and a little “je ne said quoi.”  On night two, I actually bedazzeled my soup bowl with a lightly fried egg with a runny yolk.  Delicious.

Curried Cauliflower and Broccoli Soup with White Cheddar

2 tablespoons butter
1 large onion, diced
2 cloves garlic, thinly sliced
2-3 teaspoons curry powder
1/4 teaspoon cayenne pepper
1/4 teaspoons ground nutmeg
1 head cauliflower, cut into florets
1 large russet potato, peeled and diced
4 cups reduced sodium chicken stock
1 small head broccoli, cut into florets
2 teaspoons honey
2 tablespoons red wine vinegar, white wine vinegar, or lemon juice
1 1/2 cups shredded sharp white cheddar
Toasted pine nuts for garnish (optional)

-       In a large soup pot, preheat 2 tablespoons butter over medium heat
-       Once butter has melted, add onion, and season with salt and pepper.  Sauté, stirring occasionally, until onion has softened, about 8 minutes
-       Add garlic, curry, cayenne, and nutmeg.  Sauté for about 1 minute
-       Add cauliflower, potato, and enough chicken stock to just cover the vegetables.
-       Bring to a boil, and simmer, stirring occasionally for about 10 minutes. 
-       Then add broccoli, and simmer until all vegetables are very tender.
-       Puree with am immersion blender until smooth, with a few stray chunks of cauliflower.

-       In the soup bowl, serve soup with a couple of tablespoons shredded white cheddar, stirred in so that it melts.  Garnish with additional cheese, toasted pine nuts, and/or a poached or over easy egg.

Sunday, March 10, 2013

Spanikopita


When I was kid, New Year’s Eve meant three things: a slew of movies from Blockbuster, Best Kosher cocktail hot dogs wrapped in cresent dough (a company that has since gone out of business), and my mom’s spinach cheese pie.  Spinach cheese pie is, in reality, the Greek speciality Spanikopita (a mixture of spinach and feta cheese wrapped in flaky layers of phyllo dough), but that’s not what we called it in my house.  Also, traditionally, Spanikopita is wrapped in individual pieces and ours was always prepared more like a casserole, with spinach-feta filling, and a phyllo dough floor and ceiling.  The filling is simple: sautéed onions, dill, parsely, eggs, tons of frozen spinach, and an entire pound of feta cheese (if you’re not a huge fan of feta, you could cut it down a bit; of course, I did not do this). 
I have no idea what made me think of Spanikopita last week, but on Wednesday morning at work, I found myself emailing my mom, requesting the recipe.  She sent it to me almost immediately because she wasn’t working that day due to inclement weather in Detroit.  I read it and it seemed simple enough; however, I should have known better considering we only ate it once a year.  After compiling this recipe last Sunday, I can tell you from experience, it is indeed simple, but time consuming.  The nice thing about Sundays is that you have the time to stand over your sink, squeezing the water out of handful after handful of frozen spinach, as the sensation of the cold radiates up the nerve running behind your forearm, up to your elbow.  I’ll admit that part was not my favorite, but I did thoroughly enjoy brushing sheet after sheet of phyllo dough with melted butter.  Any recipe that requires the use of a brush has inherent merit because that is such a satisfying act; when your medium is melted butter, this undoubtedly earns the recipe bonus points.  Not only is that a satisfying process, but it results in a creation with a golden, crinkled top, kind of like an ancient scroll of sorts, but instead of being old, it tastes great. Thus, if you have a couple of hours on your hands, definitely make this recipe.
Spinach Cheese Pie

4 pkgs. frozen chopped spinach – thawed and squeezed of extra water
1 onion – finely chopped
¼ cup olive oil
1 lb. feta cheese (may want to rinse brine to decrease salt)
4 eggs, slightly beaten
1 ½ tsp dried dill
¼ cup chopped fresh parsley
½ lb. phyllo pastry leaves
½ cup butter, melted

-       Saute onion in oil for 5 minutes, add spinach and simmer to remove excel moisture.
-       Crumble cheese and mix in eggs, dill, and parsley.  Combine with spinach mixture until blended.
-       Line an oiled 11x14x2” pan (or a 13x9x2”pan) with 8 buttered sheets of phyllo.
-       Pour in spinach cheese mixture and spread evenly.
-       Top with 8-10 buttered sheets.  Bake at 350 degree oven for about 45 minutes or until golden brown. 

Wednesday, August 1, 2012

Grilled Tofu and Vegetables... And Sandwiches


I actually really enjoy tofu.  Truly.  I like it so much that I will eat cubes of it cold, straight from the package when I am cooking.  You may not believe me, but after perusing my other recipes, I think it will become quickly obvious that I am not trying to impress anyone with my healthy eating habits.  Sometimes, it’s nice to marinate some tofu and vegetables (bell peppers, zucchini, and cremini mushrooms), and get them on the grill.  They don’t require much time to marinate or grill, and they make for a virtuous, complete dinner when paired with some brown rice.  I let all grilled items take a 10-minute dip in a flavorful Asian marinade with soy sauce, garlic, sesame oil, and fresh limejuice to avoid any boring vegetable qualities. 
The key is to use a medium low heat, and spray the grill liberally with non-stick cooking spray (this will also lead to a delightful flare-up, which I’m sure is dangerous).  The bell peppers and the mushrooms take the longest to grill, so start there.  However, the tofu poses the greatest danger of sticking.  Grill the stout planks of tofu for about 3 minutes on one side, flip, and repeat.  When flipping them or removing them from the grill, give them a very gentle side-to-side shimmy until they release.  If they stick a little, don’t panic.  Simply proceed as planned, but then remove any pieces that stick and be sure to eat them.  They have sort of a bacony quality.
The best part of this meal was the leftovers.  And, to be honest, I designed this meal with the leftovers in mind.  For anyone out there who claims they dislike leftovers, I say you’re simply not putting enough thought into the use your leftovers.  Not everyone enjoys forkfuls of cold, sauced pasta; I’ll acknowledge that.  However, with a little thought put into your cooking, your leftovers can be a delicious wonder in their own right.  Case in point: grilled tofu and vegetable sandwiches.  I spiked some mayonnaise with limejuice and sriracha.  I then layered the leftover zucchini, grilled peppers, and tofu on some rosemary sourdough bread with some of my spicy, tart sauce, and enjoyed a very flavorful and satisfying sandwich.
Grilled Tofu and Vegetables

Juice of 1 lime
2 teaspoons honey
1 garlic clove, grated
3 tablespoons soy sauce
2 tablepsoons fish sauce
2 teaspoons toasted sesame oil
1 teaspoon sriracha
2 tablespoons rice wine vinegar
3 tablespoons canola oil (or other light colored oil)
1-2 zucchini, sliced in long planks
2 red bell peppers, sliced into “cheeks”
8-10 cremini mushrooms, stems trimmed
1 block of extra firm tofu

-       Cut tofu into 6 pieces.  Line a shallow, wide dish with a clean cloth napkin.  Lay tofu pieces in napkin and wrap the napkin over the tofu.  Place a heavy bottomed pot over the napkin and allow tofu to drain for 15-20 minutes.
-       Whisk together the first 9 ingredients for marinade, and prepare vegetable. In one or two wide dishes, lay all ingredients down and pour 3/4 of marinade over them.  Gently flip tofu and vegetables in marinade.
-       Preheat grill to medium, and then reduce heat to medium low just before adding food to the grill.
-       Cook bell peppers and mushrooms for 8-10 minutes total, or until tender.
-       Cook tofu and zucchini for 4-5 minutes total.
-       Serve with brown rice and drizzle with remaining marinade.

Sunday, June 10, 2012

White Bean and Feta Dip


This is a tasty to morsel to share with friends, and requires no heat to make (a big bonus in these summer months).  It is sort of like an Italian hummus: smooth, creamy bean dip flavored with garlic and lemon.  Unlike hummus, it is made with white beans, as opposed to chickpeas, and it does not contain tahini (a sesame seed paste that all legitimate hummus contains).  It also has some fresh herbs in it.  I would recommend putting them in at the very end of the blending process, as my herbs became a little overly-pulverized for my tastes.  It was still delicious. 
I made a big mess
It is based on a recipe by Giada de Laurentiis, but made infinitely better by the addition of feta cheese.  She recommends serving it with pita chips, but I prefer sliced hothouse cucumber.  It’s much more refreshing.  I used an immersion blender to make this.  The recipe is easier with a traditional blender, but still manageable with an immersion blender.  You may have to dislodge some beans from the blade intermittently, and occasionally do a little hand mixing for even distribution of ingredients.  Or at least that’s what happened to me.  But it was well worth that minimal extra effort for a creamy, garlicky, crowd-pleasing appetizer. 
White Bean and Feta Dip (adapted from Giada de Laurentiis)

1-14 oz. can cannellini beans or great northern beans, drained and rinsed
1 clove of garlic, grated on a microplane
Juice of 1 lemon
1 tablespoon water
1 tablespoon chopped fresh thyme
2 tablespoons chopped fresh parsley
1/4 cup extra virgin olive oil (you may not need all of it)
1/4 cup crumbled feta cheese
1/2 teaspoon kosher salt
1/2 teaspoon freshly ground black pepper
Hot house/seedless cucumber, sliced
Extra feta, herbs, and olive oil for garnish

-       Place beans, lemon juice, water, and grated garlic in the base of a blender or the canister of an immersion blender.  Pulse a few times to begin to combine the ingredients.
-       Add olive oil slowly (if using a traditional blender, use a slow steady stream; if using an immersion blender, add a tablespoon or two at a time, blend, hand stir, and repeat until you achieve your desired consistency).
-       Add herbs, feta, and salt/pepper.  Blend again.  Check for seasoning.  Garnish with an extra drizzle of olive oil, sprinkle of herbs and feta, if desired.  Serve with cucumber slices, crackers, or tortilla chips, etc.

Thursday, June 7, 2012

Roasted Red Pepper Salad

I have spent the last month cooking hamburgers on my grill, striving towards the perfectly cooked, medium burger.  Grilling is a delicate dance between timing and heat.  It takes just the right balance to achieve a moderate char on the outside and a juicy, pink inside.  No one wants a blue burger, or a hockey puck, and no one wants a burger with a gray exterior, no matter how perfectly pink it may be in the middle.  Apparently, I have a few more burgers to screw up before I manage to avoid all of these undesirable traits. 
Roasted red peppers seemed like an appropriate antidote to alleviate my grilling frustrations.  Roasting peppers is fairly foolproof, although it is definitely a labor of love.  It takes time and patience, but yields something delectable.  Store-bought roasted red peppers are perfectly fine, especially when used as an augmentative ingredient in pasta or a green salad.  However, when the peppers are headlining the event, it makes a notable difference to roast them yourself.  They are smoky, meaty, and sweet, with a soft, buttery texture.  If you have the time, it is actually fun, and largely uninvolved.  You simply put whole peppers on the grill until they are charred.  Then they steam together for a bit, and last they must be lovingly peeled.  Then they are ready for you to chow down.  If you are going to do it, do it with at least 4 peppers so that it is worth your while.
The salad I made was comprised of the smoky peppers, cut into strips, as well as every herb I have growing on my patio, with capers, kalamata olives, and a kiss of garlic.  I am particularly proud of my thriving herb pot because I attempted this last year, and it was a disaster.  My herbs were infested with earwigs, and then I refused to water them, and eventually I had a pot of dead herbs camped out on my patio.  My full, green plants are a sight for sore eyes.
Essentially, this salad is all things good in the world mixed in a bowl.  And if you were concerned that a few were missing, you could follow my example and serve a caprese salad and some bread along side.  I love a dinner like this on a hot summer night: cold, and vegetable-laden, yet still rich and satisfying.  With the leftovers, I chopped the salad roughly, and tossed it with hot rigatoni, extra basil, and fresh mozzarella.  Delicious.

Roasted Red Pepper Salad (based on Giada de Laurentiis’s recipe)

2 red bell peppers
1 orange bell pepper
1 yellow bell pepper
1 teaspoon chopped fresh thyme
2 tablespoons chopped fresh parsley
12 basil leaves, torn
1/3 cup kalamata olives, pitted and quartered
2 tablespoons capers
1/2 garlic clove, grated on a microplane
2-3 tablespoons extra virgin olive oil
1 teaspoon red wine vinegar
Kosher salt and freshly ground black pepper to taste

-       Preheat a grill to medium high for about 10 minutes
-       Place the peppers on the grill, and cook for 20-25 minutes.  Rotate every 5 minutes so that the skin of the pepper becomes evenly charred, and the whole pepper softens.
-       When charred, remove peppers from the grill and place in a large bowl.  Cover with plastic wrap and let sit for 10-15 minutes.
-       Next place peppers on a plate or cutting board to cool for an additional 10 minutes, or however long it takes for you to be able to handle the peppers.
-       Tear peppers open, remove stem and seeds and peel off all the skin.  It should be easy to remove.  If it is difficult to remove seeds, rinse the peppers gently.  Only do this when necessary and use water sparingly as it will rinse off the smoky flavor of the grill.
-       Cut the peppers into strips, and add all of the remaining ingredients, seasoning to taste.  Eat the salad as is, or with chicken, a caprese salad, bread, or however you’d like.  It’s also great as a condiment on a sandwich.

Sunday, January 8, 2012

Shakshuka


This recipe is foolproof.  The evening I made it, I was behaving like a fool, and it still came out great.  That day, I picked up a new pair of glasses, which was an exciting event since they are my first new pair in nine years.  When I retrieved them from the optometrist’s office, I relegated my contacts to a clean, white case in order to test out the glasses, and wore the glasses home.  This was my first foolish decision as the new prescription left me initially disoriented, which probably did not bode well for my driving.  I drove home nervously, hauled my things up to my apartment, and couldn’t find the contacts case.  After a quick and unsuccessful peruse of my car, I became a little panicky.  When the new prescription left me feeling nauseous, my heart rate picked up.  After a more thorough but equally unsuccessful search of my car and a call to the optometrist’s office to see if I had abandoned them, I started to sweat.  Just when I was in a complete state of panic, I found my contacts tucked neatly into my new glasses class, which left me feeling stupid, but relieved.
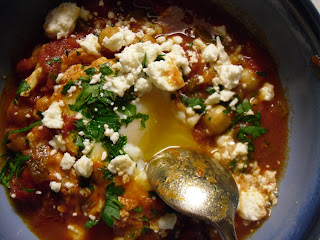
I then began to focus my nervous energy on dinner.  I had some feta cheese I wanted to use, so I turned to Tastespotting for inspiration.  While browsing the website, I was amazed to find every recipe had feta cheese in it.  I thought the stars were aligning in my favor, but then I realized that I had actually searched for feta cheese, and forgotten that detail.  Sigh.  Luckily, amidst all of this, I remembered something called shakshuka, which I have been meaning to make for some time (I pronounce this as “shack-shooka,” but I probably wrong).  It is an Israeli dish where eggs are poached in a spicy tomato sauce and topped with feta cheese.  Eggs in tomato sauce may sound strange, but it is common in Italian cooking and, of course, in shakshuka.  At an old restaurant job, one of the chefs used to make it for the staff.  Also, a friend recently e-mailed me a shakshuka recipe and Bon Appétit published a version in the December issue.  I’m not sure how all of this information was accessible in my brain when I was incapable of retaining other more recent and relevant details, but I went ahead and made shakshuka anyway. 
The tomato sauce had a good, strong kick from fresh jalapenos (which I partially seeded), and bold smokiness from a healthy dose of cumin and paprika.  I first sautéed onions and jalapenos in olive oil and added the spices to toast them before adding the tomatoes.  The spices mixed the onions looked like sludge and smelled like heaven.  Then that mass of concentrated flavor was simmered with tomatoes and some chickpeas.  After bubbling and mingling together, eggs were gently poached in the sauce until the whites were cooked, but the yolks remained runny and luscious.  Personally, I air on the side of a slightly overcooked yolk to prevent the dilemma of snotty egg whites.  The bottoms of the yolk were cooked hard, but there was still plenty of velvety yolk (and none of that snot that I hate).  I finished it with fresh parsley and lots of salty feta, and ate it with a spoon to effectively scrape the bottom of the bowl.  It made for a spicy, satisfying, and inexpensive weeknight meal. 

Shakshuka (adapted from Smitten Kitchen and Epicurious)

¼ cup olive oil

2 jalapeños, stemmed, seeded, and finely chopped (I removed about ½ of the stems/seeds)
1 small yellow onion, chopped

3 cloves garlic, minced

1 teaspoon ground cumin

1 tablespoon paprika

1 28-ounce can whole peeled tomatoes, undrained
1 14-ounce can chickpeas, drained and rinsed (I used about a cup)
Kosher salt, to taste

4 eggs

1/2 cup feta cheese, crumbled

2-3 tablespoons chopped flat-leaf parsley

Warm pitas, for serving (optional)

Heat oil in a 12-inch skillet over medium-high heat. Add chiles and onions and cook, stirring occasionally, until soft and golden brown, about 10 minutes.

Add garlic, cumin, and paprika, and cook, stirring frequently, until garlic is soft, about 2 more minutes.

Put tomatoes and their liquid into a medium bowl and crush with your hands. Add crushed tomatoes and their liquid to skillet along with ½ cup water and chickpeas, reduce heat to medium, and simmer, stirring occasionally, until thickened slightly, about 15 minutes. Season sauce with kosher salt.

Crack eggs into a small bowl one at a time, and add them gently to the sauce so that eggs are evenly distributed across sauce’s surface. Cover skillet and cook until yolks are just set, about 7 minutes. Using a spoon, baste the whites of the eggs with tomato mixture, being careful not to disturb the yolk. Sprinkle shakshuka with feta and parsley and serve with pitas, for dipping.

Monday, December 28, 2009

Macaroni and Cheese with Tomatoes


What do Jews do in Phoenix on Christmas?  Barbeque!  Unless you want Chinese food, there will be no going out.  Plus, I’m here visiting my baby niece, and a barbeque was a nice opportunity for everyone to see her, and give her lots of kisses.  You would want to give her kisses, too, if given such a golden opportunity.  My psycho-cooker-contribution to the occasion was macaroni and cheese.  Mac and cheese is always a welcome contribution to a barbeque, and this is not just any mac and cheese.  It is a very special one with tomatoes, that also happens to be ultra-delish, and has the added bonus of consisting of six ingredients, including salt and pepper.  I have been making it for years, and it always receives rave reviews. 

I adapted it from a recipe in Joan Schwartz’s macaroni and cheese cookbook.  My slightly altered version is remarkably simple: penne pasta, 2 types of cheddar, canned tomatoes, salt, and pepper.  The key to success lies in allowing it sit for at least four hours in the refrigerator, between assembly and baking.  During this incubation period, something magical happens between the juicy tomatoes and cheese, and the pasta absorbs the mysterious sauciness.  After everything is allowed to saturate, the pasta is baked, and becomes crunchy and browned on top, and saucy and cheesy below the surface. 

Another distinguishing element: the cheese is diced, not shredded, resulting in an über-cheesy final product.  Please refrain from laughing, but this macaroni and cheese is also fairly healthy when compared to other recipes within the mac and cheese genre.  Perhaps “less unhealthy” is a more accurate description.  It lacks butter, cream, half-and-half, whole milk, double cream Brie, or anything of the sort.  The cheesy factor is created solely by the presence of abundant cheddar.  Not only do I believe that this makes the dish less unhealthy, but it also gives the dish a greater cheesy flavor since it doesn’t have any cream or béchamel diluting the cheese.  As wonderful as this mac and cheese is, and despite the fact that I firmly believe that it is the least unhealthy of mac and cheese recipes, I will not attempt to claim that the tomatoes count as a vegetable.  Not even a cheese-addicted psycho cooker would be that foolish.  However, the flavor they impart is invaluable, cutting the richness and monotony of endless cheese, and there must be at least a trace of lycopenes.  
      
Mac and Cheese with Tomatoes

1 lb. penne pasta
1-28 oz. whole peeled tomatoes
½-1 lb. of mild cheddar, diced
½-1 lb. of sharp cheddar, diced
·      You want somewhere between a pound and a pound and a half of cheese total.  I think a pound and a quarter is perfect, but it’s a personal preference.
·      Place the cheese in the freezer for 10 minutes for easy chopping.
Kosher salt and fresh ground pepper

·      Placed a large pot of water on the stove over high heat.  When boiling, add a tablespoon of salted water and the pasta.  Cook the pasta, but drain the pasta 2-3 minutes before it is fully cooked (about 8-9 minutes).
·      Place the tomatoes with juice in a large bowl.  Break apart tomatoes with your hands or a wooden spoon.
·      Add diced cheese, pasta, and salt and pepper to taste.
·      Add pasta mixture to a 9-inch by 13-inch baking dish.  (A sprintz of cooking spray will make the pan easier to clean.)
·      Cover the pasta mixture and allow to sit in the refrigerator for at least 4 hours (or as long as overnight).
·      Bake at 350 degrees for 40-50 minutes, or until hot, bubbly, and browned on top. 

Friday, December 18, 2009

Black Bean Salad and Roasted Poblano Quesadillas


I adore Deb Perelman’s blog, Smitten Kitchen.  It’s fun to read, the recipes always sound great, and she takes beautiful pictures.  Deb even provides pictures of her adorable baby, who lacks the alien-like quality frequently associated with newborns.  I say the food sounds great because I had never made one of her recipes until the other night.  I actually have a document on my computer devoted entirely to Smitten Kitchen recipes that I intend to make, but I only acted on this for the first time earlier this week.  It was a variation of her black bean confetti salad.  I stumbled upon the recipe about two months ago, and immediately wanted to make this delightful concoction: black beans, bell peppers, in a lime and cumin vinaigrette.  As ridiculous as it may sound, I have an irrational love of black beans.  I love their creamy texture, and the contrasting colors of the exterior and interior. 

The recipe had me entranced, but I struggled to dream up an appropriate companion for this salad.  Deb suggests a green salad, but the absence of salad on my blog may serve as an indicator for how I feel about that.  Sometime last week, the notion of roasted poblano quesadillas dawned upon me.  I’d love to take credit for the idea, but I have no doubt that the notion was planted in my head by some Food Network show eons ago, and it has just been waiting for an opportunity to come to fruition.  Anyway, once I thought of it, I felt like black bean salad and roasted poblano* quesadillas would be the best of friends, and it would be an utter tragedy to keep them apart.  Plus, school has been audaciously encroaching on my cooking endeavors of late, and I felt that the process of roasting peppers might soothe my culinarily-deprive soul. 

Black Bean Salad (adapted from Smitten Kitchen’s Black Bean Confetti Salad)

1 green pepper, diced
½ red pepper, diced
About 15 grape tomatoes, halved
2 tablespoons finely chopped red onion (about a quarter of an onion)
1-14 oz. can black beans, drained and rinsed
2 tablespoons finely chopped parsley or cilantro
Juice of one lime (one generous tablespoon)
3 tablespoons extra virgin olive oil
1 teaspoon cumin
½ teaspoon honey
¼ teaspoon Sriracha* hot sauce
BIG pinch of kosher salt
Freshly ground black pepper

Quesadillas:

2 poblano* peppers
1½ cups shredded Monterey jack cheese
4 large wheat tortillas
2 teaspoons olive oil

·      First, prepare the peppers:
·      Most people prepare these using a broiler or the open flame of a gas stove.  I have an electric stove and my broiler scares me, so I used one of my burners like a broiler.  I turned one of the burners on to high, and let it preheat until it was red-hot.  Then, using tongs, I held a pepper just above the burner (about an inch, give or take) until the skin was charred and blistered (about 3-4 minutes per side).
·      Place the peppers in a bowl and cover tightly with plastic wrap.  Let sit for at least 10 minutes.
·      Peel off charred skin.  Cut or tear the pepper open, and remove seeds and stems.  Cut or tear the pepper into ½ to one-inch strips (this is very easy to do with your clean hands).  Set strips of pepper aside.  Wash your hands thoroughly, and until then, and avoid touching your eyes or face, not that you should be touching those elements while cooking, anyway.

·      Next, prepare the salad:
·      Whisk together lime juice, cumin, honey, Sriracha, and salt.  Then whisk in olive oil, and set dressing aside.
·      Prep vegetables, beans, and fresh herb of choice.  Combine in a bowl.
·      Add about half the dressing and a few grinds of pepper; taste for seasoning, and add more dressing if necessary. 

·      Last, make the quesadillas:
·      In a large skillet, preheat a drizzle of olive oil (about a half teaspoon) over medium-high heat.
·      Place a tortilla in the pan.  Add about a quarter of the cheese and a quarter of the roasted peppers on half of the tortilla, and fold over the empty side.  Cook for a few minutes on each side until cheese is melted and the tortilla is golden.
·      Add more oil if necessary and repeat with the remaining tortillas, cheese, and peppers; cut quesadillas into wedges.
·      Serve quesadillas with black bean salad and enjoy!

Comments:  This was so lovely, and the leftovers made for a few very satisfying lunches, and I did not even bother to reheat the quesadillas.  Be careful with the dressing:  you will most likely not need all of it.  I foolishly dumped all of it on my salad.  The recipe only yields a quarter cup of dressing, which didn’t seem excessive.  Well, it turned out to be quite excessive, and I ended up having to drain my salad through a sieve, which was a simple antidote, but could be easily avoided by a savvy reader like you. 

This method of roasting peppers is a little time consuming, due to the fact that you can only tackle one pepper at a time.  My broiler scares me, so it seemed like the safest way.  Safety aside, it was more fun than an amusement park.  I kid you not:  the process was a lot of fun, and a feast for the senses.  You can smell, see, and hear the progression occurring before you.  The squeaky noise the peppers make as they blister is just blissful.  I would recommend holding the tongs with an oven mitt, because they will get quite hot, and your arm may get a little tired, but it’s worth it.  Not only is it fun, but those roasted peppers are a tasty treat.  Mine had a nice kick, but most poblanos are pretty mild.  If you have an aversion to heat, just use a bell pepper, and I’m confident that you will be quite content with your meal. 

*See glossary for definitions